No Such Thing as Free Solar

As a Wisconsin homeowner, you may have seen an advertisement for free solar on social media, or even claims that you can get paid to go solar based on your city or county.

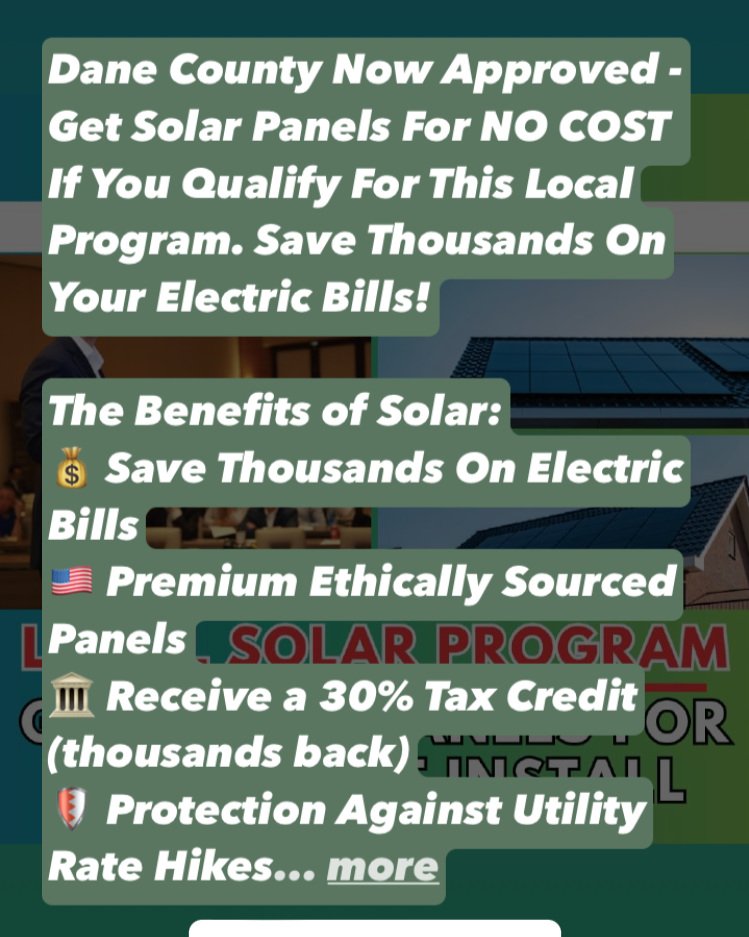
These claims are highly misleading. There is no such thing as free solar.

Claim: Get Paid to Go Solar

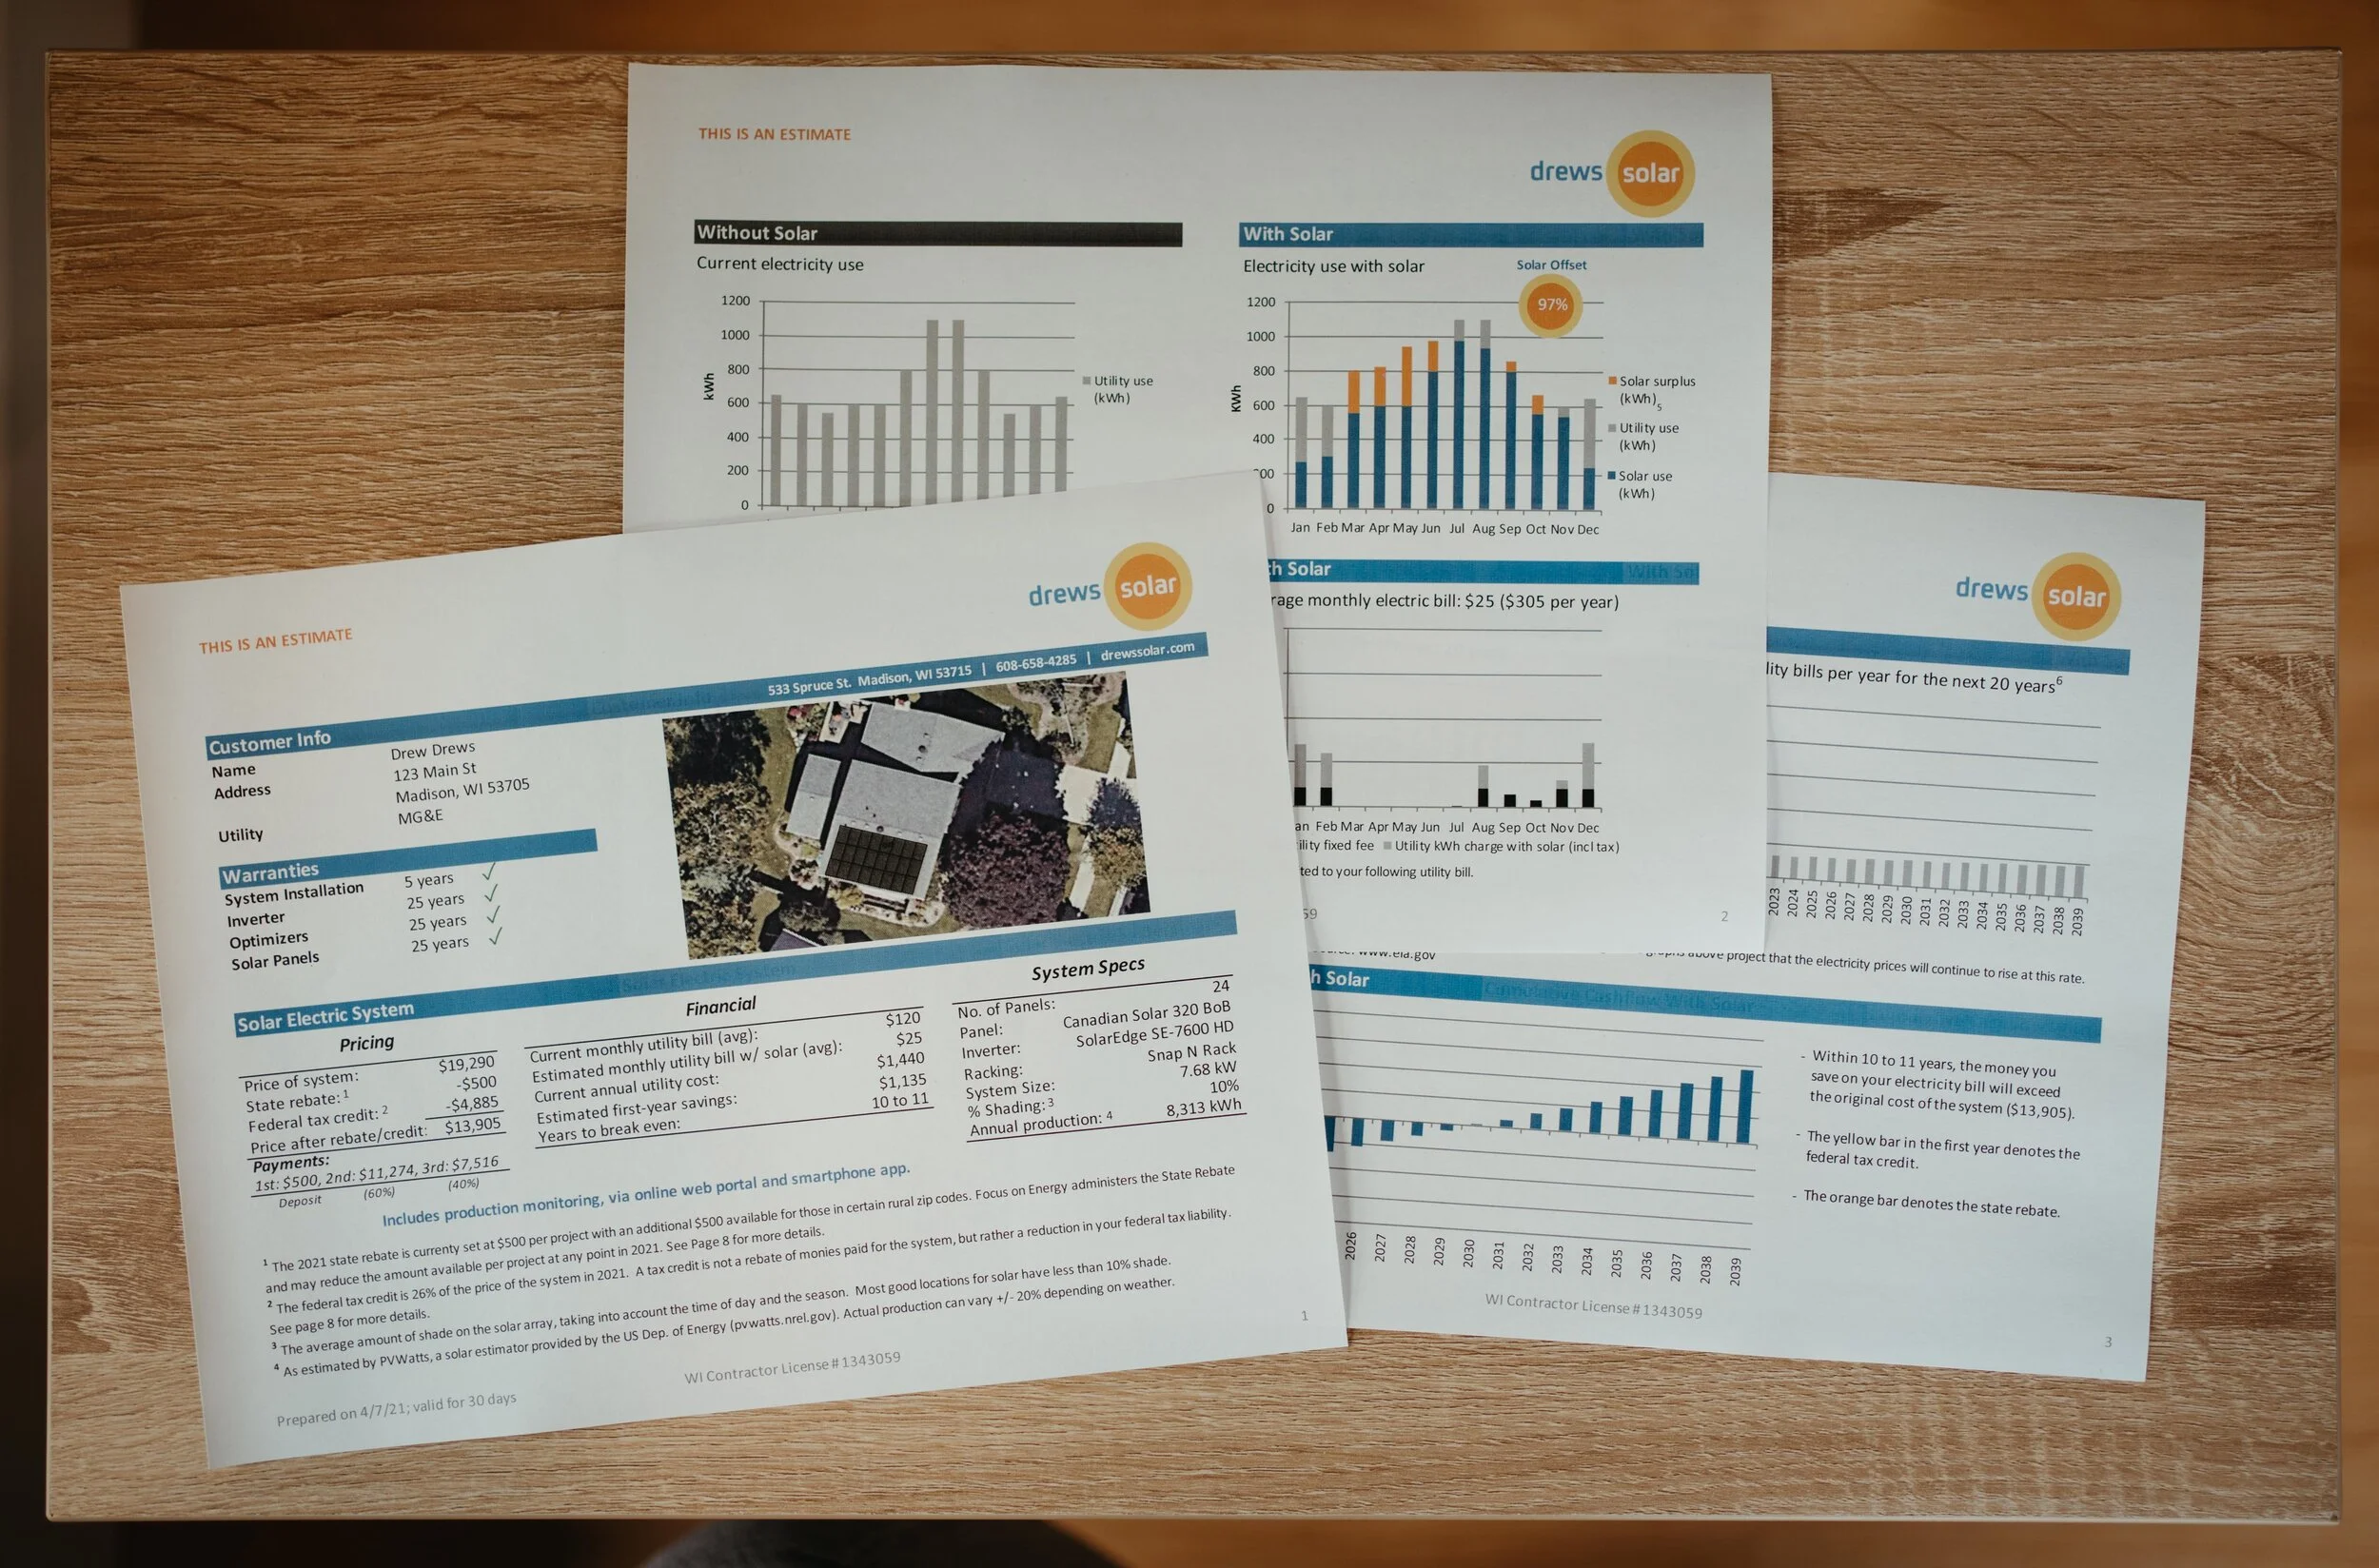
There are two public programs that reduce the cost of going solar, the federal solar tax credit and the Wisconsin Focus on Energy state rebate. Both programs are publicly available to all residents of Wisconsin and significantly reduce the cost of going solar. Many of the advertised claims of “getting paid” to go solar are simply referring to the federal tax credit and state rebate.

Federal Solar Tax Credit

You may claim the 30% credit on your income taxes for the year that the system installation was completed and commissioned by the utility. The credit is claimed on IRS Form 5695, and you can include all costs you incurred when installing the solar system. If the tax amount that you owe is less than your credit, you can claim the credit to pay for that year's taxes, but the balance will carry to the following year. The tax credit is 30% for systems installed for all years between 2022 and 2032!

Wisconsin Focus on Energy Rebate

The 2024 Wisconsin state rebate for residential systems will be a maximum of $500, with a $500 bonus for these rural zip codes. The solar array must meet several requirements, the two most important being the solar panels must be orientated within 135 degrees of due South and must receive 15% or less shading from nearby structures and/or vegetation. To receive this incentive, click here to make sure your utility is a Focus on Energy partner. After the system has been installed, you will receive the rebate in the mail in the form of a check.

For instance, an advertisement claiming you could “get paid $11,000 for going solar” would be referring to the tax credit and rebate you would receive for a $30,000 residential solar array in a rural area: a $10,000 federal tax credit and a $1,000 state rebate ($500 residential rebate plus the $500 rural bonus).

Claim: Go Solar for No Cost

The advertisements also claim that you can go solar at “no cost”, implying that there are public programs available to pay for your residential solar array. Unfortunately, this claim is also misleading. The way you go solar at “no cost” is by taking out a loan to go solar or financing your solar project through your solar installation company. Instead of paying for your solar array at the time of your installation, you pay no money down at installation, but pay for your solar array in monthly installments, just like you would when buying a car with financing. The cost of a “no cost” solar array often ends up being more expensive over the lifetime of the solar array for two reasons: (1) the solar loans and financing include interest payments and (2) solar companies can charge higher prices by focusing customers on the “low” cost of the monthly payments instead of the total cost of going solar.

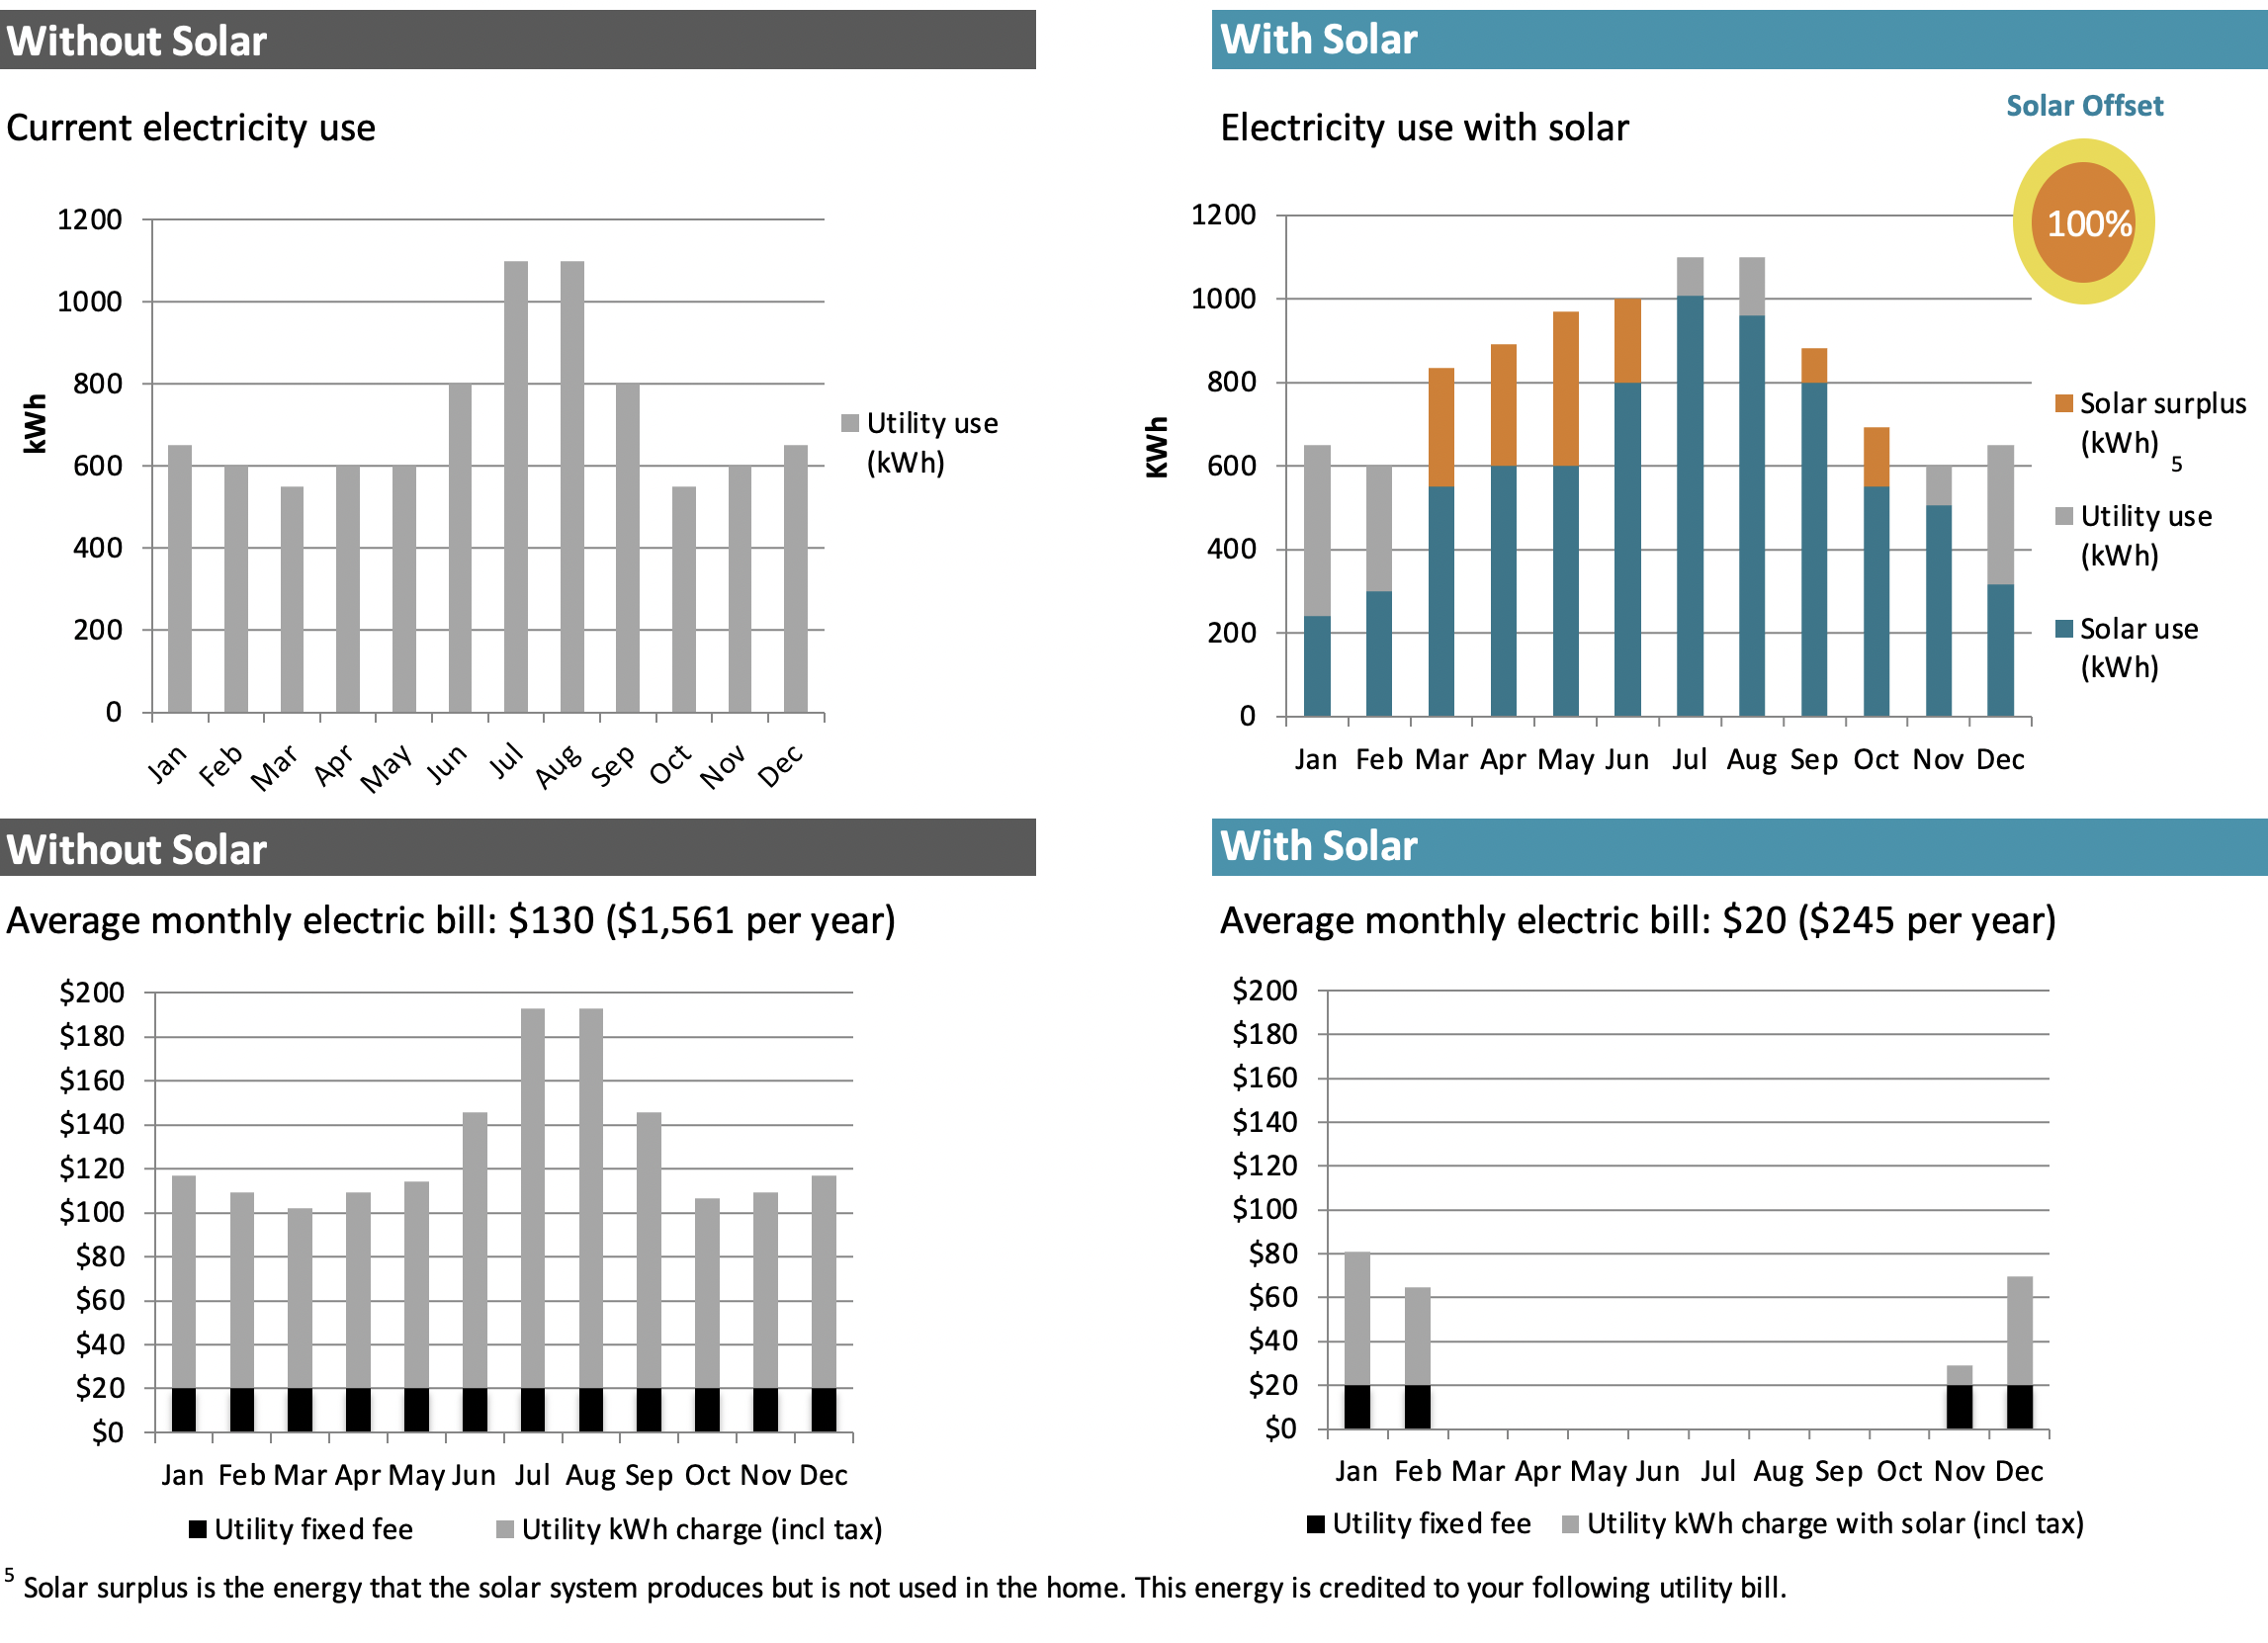
There are also claims about solar being “free” since monthly payments for a rooftop solar array will cost less than your current electric bill. Imagine if your monthly average electric bill was $300 a month before solar, your monthly average solar-loan bill will be $275 a month with solar, and you paid no money down to go solar. In this case, it is tempting to think of your rooftop solar array as completely free. But just like the free phone you receive when signing up for a cell-phone plan, you are paying for the “free” phone and then some over the lifetime of your contract. By adding up all the monthly solar-loan payments, you can see the total cost of going solar. It will likely be significantly more expensive then the total cost of going solar with a company that requires customers to pay for their solar array at the time of installation. By paying up-front, you end up saving significantly more money over the lifetime of your solar array.

Going solar should be relatively simple. If you find yourself having to work hard to calculate the total cost, get a straightforward answer on financing, or understand how the math works out in your favor, you may be working with a solar company that cares more about sales than installing quality solar arrays in our community. We highly recommend getting three estimates before going solar, asking lots of questions when things seem too good to be true, and sorting the facts from the misleading claims. For additional help on comparing solar estimates, see this guide or reach out to us for help.


MG&E, Alliant, and the future of Net Metering in Wisconsin

In spring of 2023, both Madison Gas and Electric and Alliant Energy proposed changes to how they bill and meter solar customers. The proposed changes would have reduced the amount homeowners were paid for excess energy production pushed back onto the grid, increased the amount of time it took solar arrays to pay for themselves, and increased the unpredictability to bills after going solar.

To read about MG&E’s 2023 proposed changes to net metering, click here.

Over the summer of 2023, Alliant Energy and Renew Wisconsin (a major renewables advocacy organization) negotiated a compromise deal called the Power Partnership Version 2 (PP V2). Drews Solar worked with Renew Wisconsin in the creation of the compromise deal and supported the adoption of PP V2 as a fair alternative to net metering. While net metering remained the best option to incentivize the adoption of more residential solar in Wisconsin, PP V2 also paid homeowners fair compensation for their electricity overproduction and kept payback periods to a reasonable period, ensuring homeowners could continue to economically benefit from going solar.

To read about Alliant’s 2023 proposed Power Partnership Version 2, click here.

In November of 2023, the Wisconsin Public Service Commission (PSC), the state regulatory body in charge of approving any changes to utility rate and rate structures, rejected both MG&E’s proposal and the Alliant PP V2 compromise deal. the Public Service Commission spoke highly of PP V2 and the compromise deal reached by the utility and renewables, but ultimately decided more information, study, and a broader state-wide discussion about transitioning away from net metering was needed before approving any one utility’s proposed changes.

What does this mean?

  • It means that for 2024 and 2025, both MG&E and Alliant’s net metering policies will continue as usual. No changes are coming.

  • We expect that changes to net metering to occur sometime in the next decade. If changes do come, they would likely not be enacted until at least 2026, possibility significantly later.

  • Both MG&E and Alliant energy included long “legacy” periods in their proposals, meaning current solar homeowners could keep their rate structure for a significant number of years even after changes were enacted, protecting their investment in solar and their expected return on investment. We expect to see long legacy periods to be part of any future changes.

  • Future changes to net metering will likely be measured, fair, and backed up by data. The Public Service Commission expressed desire to have a clear, understandable, and fair rate structure if utilities were to transition away from net metering, and are willing to take the time needed to make sure changes are done correctly and protect residential rate payers and solar homeowners.

We celebrate the continuation of net metering and are encouraged by the Public Service Commission’s comments about the PP V2 proposal. We hope that if there is a transition away from net metering for some Wisconsin utilities, that a fair compromise solar rate structure will be put in its place.

SolarEdge Hybrid Inverters & Enphase Micro-Inverters

Inverter selection can be a daunting task for a solar customer, but this comparison graph shows the major differences between the three main options: (1) string inverters, such as SMA, (2) hybrid systems, such as SolarEdge’s inverter-and-optimizer system, and (3) micro-inverters like Enphase.

All major inverter brands have developed to a place of high reliability and efficiency, but when choosing between the two most common offerings in America - SolarEdge and Enphase - there are some important differences.

Both SolarEdge’s optimizers and Enphase’s micro-inverters have the same ability to optimize your solar array by:

  • Individualizing electricity production of each solar panel without being affected by shading on adjacent panels.

  • Producing power independently, so in the rare event one panel is malfunctioning, the rest of the panels in the array will continue to produce power as usual.

  • Monitoring the performance of each individual solar panel and make sure everything is running as it should.

We have chosen the SolarEdge inverter-and-optimizer system as our standard offering for our solar arrays because the hybrid system offers several benefits that micro-inverters do not:

  • Inverter Protection With SolarEdge systems, you have one (or two) inverters placed indoors, typically in the basement, as opposed to tens of inverters on your roof. Inverters are the most complex piece of technology in any solar array, and therefore the most fragile. An inverter in a protected and climate-controlled basement will be more reliable over the 30-to-40-year lifespan of your system than multiple inverters on your roof exposed to the elements and the heat of summer year after year. Plus, if an inverter needs service or replacement, it is easier and faster to access a basement inverter, reducing potential maintenance costs.

  • No Clipping When the solar panels produce more electricity than the inverter can convert to usable energy, “clipping” occurs, and all the electricity produced beyond the inverter capacity is lost.  Clipping is most likely to occur with south-facing panels on a cool, sunny day when the wattage of the inverter(s) is significantly lower than the wattage of the solar panel(s). For south-facing panels, a DC/AC a ratio above 1.15 will typically introduce clipping losses. The DC/AC ratio is calculated by dividing the panel wattage by the inverter wattage. For example, Enphase IQ 8+ used with REC 405 yields a ratio of 1.40 (405-watt solar panels / 290-watt micro-inverters = 1.40 DC/AC ratio). The effects of clipping are less pronounced when a significant portion of the solar panels are facing east or west. We size our SolarEdge to have a very low DC/AC ratio, eliminating clipping, and making sure all the energy produced by your solar panels is converted to electricity for your home.

Bottom line: Both SolarEdge and Enphase inverter systems offer high reliability, individual panel optimization and monitoring, and affordability for residential solar arrays. But we recommend SolarEdge’s hybrid optimizer-and-inverter system for our customers because the SolarEdge system offers the best chance of inverter-reliability for the 30-to-40-year lifespan of your solar array and the lowest chance of energy-loss due to clipping while still offering all the same benefits of the Enphase micro-inverter system

Best of the Best with Drews Solar

Drews Solar Family Photo.jpg

Drews Solar is a family-owned company, based in Madison since 2016. Here are some reasons why you get the best of the best when you choose Drews Solar for your solar installation:

The highest quality installation and technical expertise. Michael Drews has an engineering degree from UW Madison, his master electrician’s license, and has been working in residential solar installation for over 17 years. Michael is a significant part of every solar installation; we’d be surprised to find someone else with Michael’s level of expertise working on the roof and in the basement, making sure the installation gets done exactly right.

We’re perfectionists. We see a lot of rooftop solar arrays with external conduit routing, unattractive array placement, and poor panel and racking selection. If the outside of the solar array looks bad, it is hard to imagine that the installation quality behind the panels and hidden within the walls is much better. Drews Solar is intentionally small to ensure that every project meets our high standards. No cut corners, no hidden problems. Inspectors love us!

We make solar look good. We take special care and consideration when determining exactly where to place the array(s) on your roof to achieve the very best aesthetic outcome possible. Our roof boxes are hidden under the array, not off to the side. We route conduit inside the house over 95% of the time, avoiding outdoor conduit between the roof in the basement.

We protect your roof. We know re-roofing is expensive; we treat your roof like the valuable asset it is! Our team wears special roofing boots that don’t wear away the valuable granular surface of roof shingles. And we don’t use hammers to audibly locate your roof trusses, which can break the shingle surface, instead using special scanners find each truss.

Great value. We are committed to giving our community a great value on their solar array. We choose only high-quality panels, inverters, and components that will last 30 to 40 years, with the warranties to protect your investment. We don’t cut corners by choosing bulkier racking or poorer-quality-but-faster roof connections; we only install components we would want on our own home. And as a small company we keep our staff and operations streamlined, so we can offer competitive prices without compromising on quality parts or installation craftsmanship.

No Up-Selling We don’t up-sell homeowners, pushing panels or components that aren’t worth the investment. The BMW may have impressive specs, but the Honda will get you where you want to go over the long-term. We take the same perspective with our solar recommendations; high quality, great value, no unnecessary investment without much added benefit.

We don’t outsource any of our work. We do the work ourselves, every step of the way. No hiring outside crews or bringing in outside installers. We do all the designing, permitting, installation, and electrical work without the use of subcontractors. 

We communicate directly with our customers. As a family-owned company you know who you’ll be working with: us! We provide clear communication, respond quickly to our customers, and are easy to connect with throughout the process. Every project receives our full attention. We set realistic expectations, show up on time, and never double-book. Going solar shouldn’t be a stressful or laborious experience, and with us, it never is!

We have happy customers. Just take a look at our Google reviews! Our customers come to trust us, and for good reason. We work hard to make the whole process of going solar easy for our customers and install clean, sleek, reliable solar arrays.

We’re your neighbors and we’re committed to our community. Drews Solar is run by Michael and Maria Drews, and we are committed to our company and our community for the long run. We have put down roots in central Madison, raising our young family in the Bay Creek neighborhood. We bike year-round with our kids in our cargo bike, love packing our weekends with Madison fun, and feel grateful for all the wonderful friends and neighbors we have in the area. We are deeply committed to the well being of our community and environment and we love what we do. Installing solar isn’t just a business for us but a mission we believe in. One that will give you affordable, reliable, and clean renewable energy. We believe every panel counts!

Financing with Greenpenny & Clean Energy Credit Union

Drews Solar does not offer in-house financing. But based on our customers’ experience and our own research, we do have a few recommendations for financial institutions to consider:

Greenpenny

If you are looking for a solar-loan from an organization similar to Drews Solar, Greenpenny, a solar and renewable-energy lender, may be the right choice for you. We share a lot of values: intentionally small, dedicated to clear communication and transparency, committed to making the process as easy for homeowners as possible, and personal every step of the way. Greenpenny offers competitive rates, very low up-front fees, and flexible loans that can cover the whole cost of going solar. Drews Solar is a registered dealer with Greenpenny: we receive nothing in return for being a registered dealer, but as a trusted installer, our customers will receive discounted up-front fees and easier pre-approval for solar loans. Check out Greenpenny solar loans here.

Clean Energy Credit Union

The Clean Energy Credit Union is a national credit union that specializes in loans for renewable energy projects, including residential solar installations. Since they only provide loans for renewable projects, they make the process easy and straightforward for those going solar. Our customers who have chosen to obtain financing from the Clean Energy Credit Union have had a great experience.

Drews Solar is a registered dealer with the Clean Energy Credit Union, allowing our customers to have an even more streamlined process to obtain financing for their solar project.

Find out more about the Clean Energy Credit Union’s solar loans here.

See the Clean Energy Credit Union’s current rates here.

If you are interested in pursuing a loan through the Clean Energy Credit Union, let us know and we will send you an invitation to begin the application process.

Summit Credit Union

Many of our customers have had success obtaining loans through the locally-based Summit Credit Union. With many branches around our service area and extensive expertise in financing, they may be the right choice for your loan. 

Marine Credit Union

Marine Credit Union is a Wisconsin-based credit union that has been actively reaching out to homeowners who want to go solar. Marine Credit Union specializes in loaning to those who may not be able to easily qualify for a loan through other financial institutions. We recommend reaching out to Marine Credit Union’s solar loan specialist, Mike Ellious at mike.ellious@marinecu.com to get the process started.

It may take a bit of time, but by obtaining a solar loan from your own bank or credit union, or one of the options above, you may save a lot of money over the lifetime of your loan, making going solar an even better investment.


Get Three Estimates Before Going Solar

Not all solar companies are created equal. Unfortunately, some solar companies seem to be more interested in making a profit off of the switch to renewable energy than they are interested in installing high-quality long-lasting solar arrays and serving their customers.

So, I’m going to be honest here for a moment:

We truly care about what we do. Our goal is to help homeowners make the switch to renewable energy by installing solar arrays with the highest craftsmanship possible and exemplary customer service. We’re a small family-owned business: we live in Madison, we are raising a family here, and we will be here for decades to come. You are our neighbors, and we are committed to taking care of you and your home. Integrity is at the forefront of everything we do, and we treat our customers the way we want to be treated.

That is why news like this really bums us out:

Veteran loses 15K after Moxie Solar closes as a former executive starts new solar company

Sun Badger Solar’s Financial Turmoil Causes Anxiety for Customers who Spent Thousands on Incomplete Projects

Moxie Solar and Sun Badger Solar, both multi-state solar installation companies, served many homeowners in south-central Wisconsin before going out of business or closing, leaving some homeowners with half-finished systems, broken solar arrays with no route to get them fixed, and at worst, paid-for systems that were never installed. We have heard the stories from homeowners and neghbors who have worked with these companies are saddened by the frustrations they have faced and the money they have lost.

Here is our biggest piece of advice:

Get Three Estimates Before Going Solar

It may take you a little bit of additional time and energy but it could save you thousands of dollars and a lot of frustration down the road. It is worth the time and effort. Yes, we know that means you would be comparing our estimate against those of other solar installation companies, but we think it is that important.

And once you have received your three estimates, I personally recommend checking out our Guide to Comparing Solar Quotes when making a decision between the quotes you have received. Again, going through the steps in the guide may take a little extra time, but it could save you a lot of money and frustration down the road.

Finally:

Don’t Assume Bigger is Better

There are good big solar companies and there a good small solar companies, but we have found that big, multi-state, and national companies do not necessarily mean higher-quality, lower-prices, and better business practices. (Honestly, too often it seems to mean the opposite). We tend to trust big national brands for a lot of our shopping needs, but the same wisdom does not always apply in the solar installation field.

There are a few other solar companies that we would trust to install solar on our home if we did not have our own solar company, and they are all small, locally-owned, locally-based solar companies that have a long track record of great installations, high reviews, and solid business practices. Getting three estimates, looking at reviews, going through the guide, and doing a bit of extra work will help you find the right installer for your project. We know we can’t serve every homeowner ourselves, and we view the other high-quality local solar installation companies in our area as our partners in serving our community.

The Cost of Going Solar in 2023

The best way to find out how much it would cost to add solar to your home is by requesting a free estimate on our website (see the “Free Estimate” button in the upper-right corner of our website). But seeing an estimate for a typical home may give you an idea of the cost of going solar at your own house.

The first page of a 2023 estimate. Each estimate is typically 10-12 pages long.

This estimate shows a 7.665 kW solar array that produces about 8,594 kWh annually. Depending on your monthly electricity needs, your home may need a larger or smaller array. Other factors can effect how much energy your solar array produces and how many panels your home may need:

  • Roof Direction: If your roof faces further east or west rather than due-south, you would need additional panels to produce the same amount of electricity.

  • Roof Shade: If you have more shade from surrounding trees or buildings, you would need additional panels to offset your annual electricity needs.

  • Roof Pitch: If you have a lower-pitch roof, snow will cover your array for longer in the wintertime, bringing down your winter energy production a bit.

Beyond the number of solar panels your home requires to offset your annual electricity use, there are a few other factors that can effect the cost of going solar:

  • Roof Shape: Installations require more materials and labor if panels need to be placed on multiple small roof planes rather than on large rectangular roof planes, as pictured in this example estimate.

  • Roof Height and Pitch: Roofs that are very high or steep may require extra equipment or labor to install a rooftop array.

  • Electrical Upgrades: Some older homes or homes with large solar arrays may require electrical upgrades to handle the incoming energy of a solar array.

  • Structural Upgrades: Some outbuildings and older homes may require structural reinforcements to the internal roof structure to handle the added load of a rooftop solar array.

The typical solar array pays for itself in 10-14 years. Three factors effect how long it will take for your array to pay for itself: the number of panels you need, the cost of installation (both outlined above), and your electric utility. There are some differences between electric utilities that can effect how quickly your solar array will pay for itself:

  • Cost of Electricity: If your utility has high electricity rates, your solar array will pay for itself quicker than if your utility has low rates for each kWh of electricity.

  • Utility Metering: Many solar arrays overproduce for at least a few months in the summer. Some utilities let that overproduction “rollover” for use in future months, some utilities buy back the overproduction at the end of the month, and a small number buy back the over production at the end of the day.

  • Overproduction Buyback Rates: For utilities that do not “rollover” excess kWh to future months and instead buy it back at the end of the month, the buyback rate can effect how quickly your array will pay for itself. Utilities vary: some buy electricity back at the rate you pay for it, others buy it back at a lower wholesale rate, which is closer to 1/3 of the consumer price. The higher the buyback rate, the quicker a system pays for itself.

Finally, incentives play a significant role in the cost of going solar. Federal Residential Solar Tax Credits were recently increased and extended, bringing the 2023 federal tax credit up to 30%. The state of Wisconsin offers a solar rebate of $500 for most homeowners and $1000 for homeowners in some rural zip codes, but only if the solar array is shaded 15% or less. These two incentives significantly bring down the cost of going solar.

At Drews Solar we work to be objective and fair in our pricing, accurate in our system sizing and predictions for energy production, and upfront about all the costs of going solar. If you’re interested in an estimate for your own home, please fill out the free-estimate form on the home page of our website.

Going Net-Zero with Solar and Focus on Energy

Drews Solar was featured in a Focus on Energy video for our work on a new net-zero home. By choosing all-electric appliances and systems, and then installing a solar array that would produce all the power needed for their home, this new home will be completely powered by the sun!

To learn more about how this home went net-zero, see this great piece by Channel3000 news in Madison on the home:

The Inflation Reduction Act: Making Solar and Home Energy Efficiency more Affordable

The 2022 Inflation Reduction Act (IRA) provided federal programs makes going solar more affordable and provides incentives to help homeowners electrify and increase the energy efficiency of their home.

Here is a breakdown of some of the provisions and incentives in the bill:

Some provisions in the Inflation Reduction Act have specific provisions about household income to qualify, how much can be claimed each year, etc. If you are in a low- or moderate-income household, you may qualify for significantly more funding than what is listed below to increase the efficiency of your home. To find out just how much you qualify for based on your location, income, and household size, see Rewiring America’s Saving Calculator here.

Residential Solar

The Inflation Reduction Act extends federal tax incentives for going solar. Households can receive a tax credit for 30% of the cost of adding solar to their home from now through 2032. There are no income limits or caps for this incentive, so regardless of how large of a system you need or your household income, you will qualify for a 30% federal tax credit when going solar.

Electric Vehicles

The Clean Vehicle credit gives $7,500 credit for new electric vehicles and a $4,000 credit for used electric vehicles. You can read more about why it’s great to plan ahead for any future electric vehicles when going solar on our website here.

Electric Heating and Cooling

The Energy Efficient Home Improvement Credit gives households a 30% tax credit for the cost of installing a heat pump water heater or heat pump for home heating and cooling, up to $2000. (Read more about heat pumps here.) The credit also includes up to $600 for highly efficient central air conditioners, electric water heaters, and electric furnaces that meet or exceed the highest energy efficiency tier as set by the Consortium for Energy Efficiency. 

Stoves and Dryers

Choosing a new stove or dryer? The Inflation Reduction Act also includes up to $840 for induction stoves and ovens and heat-pump dryers. Learn more about your eligibility here.

Main Panel Upgrades

When switching over to electric heating, electric vehicles, or installing a rooftop solar array, your home may need a new main electrical panel to handle all the incoming and outgoing electricity. You can receive a 30% tax credit if you install a new main panel alongside solar or geothermal heating and up to a $600 tax credit if you install a new main panel alongside a heat pump or heat pump water heater. See details here.

When looking into going solar, it is helpful to consider if you plan on taking advantage of any of the other incentives in the next few years. We can size your system to produce for a future electric vehicle, install an EV charger at the same time we install your solar array, or oversize your system to produce the electricity needed for future electric appliances, heat pumps, or mini splits.

By switching your home and vehicles to electric power, and then adding a rooftop solar array, you will not only save money over the long run, but you will also power your home and vehicles with renewable energy. And, with the new federal incentives, making the switch may be more affordable than you thought.

Disclaimer: we are not tax experts and cannot guarantee incentives or eligibility. We encourage you to talk to a tax professional before making any major decisions.

Additional Resources:

Rewiring America Inflation Reduction Act Guide for Homeowners

Federal Government Info on the Inflation Reduction Act for Homeowners

Dane County Climate Action- Taking Advantage of the IRA

Electrify Now- Resources on electrifying your home, vehicle, and power source

This Guide Can Help You Save Money and Fight Climate Change- NYTs

Does My Roof Need Structural Reinforcements?

An example of an older home that required structural reinforcements before adding a rooftop solar array.

Based on the age and structure of your home, your roof may need structural reinforcements to handle the added load of a rooftop solar array.

Rafters or Trusses?

Trusses are norm in homes built after 1970, rafters are the norm for homes built before 1959.

Typically, older homes with a rafter roof structure will need structural upgrades within their attic space. Homes built in the 1950s and earlier likely have rafter construction. Newer homes with a truss roof structure will not need structural upgrades to go solar. Homes built in the 1970s and later likely have truss construction. For homes built in the 1960s, we recommend peaking through your attic hatch to see if your home was built with trusses or rafters.

There are a couple of exceptions for homes with rafters. First, newer homes built with rafters to accommodate lofted ceilings likely have overbuilt rafters that do not require additional reinforcements to go solar. Second, older homes with very short rafters may not need reinforcements. If the horizontal distance between the roof peak and the outside wall of your house is 10 feet or less, there is a good chance reinforcements won’t be needed due to the short rafter length.

Why are Reinforcements Needed?

Reinforcements are needed to ensure your roof can handle the load of a rooftop solar array without sagging over time. They are also required to meet building codes for rooftop solar and to obtain a permit for the installation of a rooftop array.

An example of the technical drawings we do for every solar project.

Solar panels themselves are relatively lightweight. Potential load issues occur when snow falls on a solar array. When snow accumulates on roof without a solar array, the weight is distributed across the whole surface of the rooftop. When snow falls on a solar array, the weight of the snow is transferred to the points where the solar array is attached to the roof. Building codes have requirements for how much load rafters can carry. For all of our solar customers, we do drawings and structural calculations to ensure that potential loads will not exceed the code limits for the roof structure. If the load will exceed the code limits for the home’s roof structure, then structural reinforcements are required before going solar.

Are Reinforcements Possible?

If we determine that structural reinforcements are needed, we then need to determine if they are possible. To place most structural reinforcements, the whole length of the rafter needs to be exposed in the attic space. If a homeowner has a large, accessible, unfinished attic, where the entire length of the rafters is accessible from the attic, then placing structural reinforcements may be possible.

A large, unfinished attic where the entire length of the rafters is accessible.

Structural reinforcements are not possible when the home has:

The second story of the home is partially in the attic space, indicating structural reinforcements will not be possible.

  • A finished attic space or a lofted dry-walled ceiling.

  • Angled or slanted ceilings, indicating that rafters begin in the second story rather than at the attic floor.

  • An attic space that is too small to allow the structural reinforcements to be placed or attic access that is too small or inaccessible to allow large pieces of lumber to be moved into the attic.

The attic is dry walled, so structural reinforcements will not be possible.

The ceilings in the second story are slanted, so structural reinforcements will not be possible.

In these cases, structural reinforcements cannot be placed without major renovations to the home, such as removing all the drywall or removing all the roof shingles and roof sheathing. When structural reinforcements cannot be placed, we recommend considering a shared solar program, such as MG&E’s Shared Solar or Alliant’s Community Solar. For those with a large property, a ground-mounted solar array may also be a great option.

Who Can Do These Reinforcements?

We are happy to assess if structural reinforcements are needed and possible for your home. If they are required, you can hire a carpenter, framer, or skilled handy-person to do the structural upgrades. After we finalize the design for your solar array, we are happy to send the plans for the necessary structural reinforcements to the contractor of your choice.

How MG&E Solar Metering Works

Madison Gas and Electric meters solar customers on a monthly basis with rollover credits. That means that at the end of each monthly billing period, if you have produced more electricity than you have consumed during the billing period, the excess energy production is “bought back” by MG&E at the full retail rate. The “buyback” becomes monetary credit in your account and is automatically applied to your next month’s bill.

For example: if your home uses 375 kWh of electricity in April and your solar array produces 525 kWh in April, MG&E would credit your account $20.85 ($0.139 x 150 kWh) at the end of the billing cycle. 

Credit in your account will continue to roll over from month-to-month until it is needed. This is wonderful for solar customers because excess energy produced during the summer months can be rolled over to the lower-producing winter months.

MG&E does have one special caveat: at the end of each monthly billing cycle, if a customer has produced more electricity than they used over the previous twelve months, MG&E automatically switches customers to a different “net seller” rate structure.

For example: at the end of the August billing cycle, your home has consumed 4800 kWh over the past 12 months but your solar array has produced 5000 kWh over the past 12 months, you would automatically be re-categorized as a “net seller.”

As a “net seller,” MG&E simply changes their metering from a monthly basis with full-rate rollover credits to a monthly basis with wholesale-rate rollover credits. This means that at the end of each monthly billing cycle, any excess energy you produced over what your household used during the month will be bought back by the utility at their wholesale rate, typically about $0.03 - $0.04 per kilowatt hour.

For example: if your home uses 525 kWh of electricity in August and your solar array produces 625 kWh in August, if your account has been switched to “net seller” status, MG&E would credit your account $3.50 ($0.03848 x 100 kWh) at the end of the billing cycle.

If in any future month you revert back to a “net producer” status, you will once again be compensated at the full retail rate for all excess solar production. To be switched back to “net producer” status, your home will need to have consumed more electricity than you have produced over the past 12 months.

For example: if your home uses more electricity than your solar array produces in November, but over the last 12 months combined, your array has produced more electricity than your home has consumed, you will continue to be in “net producer” status.

Bottom line: if you do not plan on increasing your home energy use in the next few years, we recommend sizing your solar array to produce around 95% of your historical annual electricity needs to avoid “net seller” status. Staying in “net producer” status will allow you to receive full monetary credit for any summer over-production while reducing your winter electricity bills as much as possible. While some customers may choose to over-size their system for environmental reasons or to prepare for a future EV, a system around 95% in size is the best balance of both the environmental and economic benefits of going solar.

The Two-Meter Problem

Have two electric meters on your property? Thinking of getting a second meter for a new outbuilding? Here is what you need to know about going solar with two meters.

For customers of MG&E and Alliant, as well as some local utility companies, a property would ideally have one meter when going solar. With one meter, you can save more money when going solar and offset more of your annual electricity use with solar power.

Here is an example of a typical two-meter situation: the house is on one meter, a large outbuilding on another meter, and the homeowner wants to go solar. They use 1000 kWh per month in the house, 500 kWh per month in the outbuilding, and ideally want a solar array that produces 1500 kWh per month to minimize the electrical bill and offset all their electricity needs. The outbuilding has a lot of unshaded southern-facing roof space and would be the ideal location for a solar array to power both their home and outbuilding.

Unfortunately, there are a few factors that need to be considered when adding solar to a property that has two meters:

  • A solar array can only be tied into one meter. The electricity produced by a solar array cannot be split into two lines running to different electrical meters.

  • Each meter is billed separately then combined. When a property has two meters, it is easiest to think of it as two totally separate properties put together on the same bill. When a solar array produces more electricity than is immediately used, kWh overproduction credits are credited to the meter the solar array is connected to, not all the meters on the same bill. In our example scenario, with a solar array on the outbuilding producing 1500 kWh a month, the 1500 kWh a month in electricity production would only be applied to the account of the outbuilding that uses 500 kWh a month, not to the total required by the whole property. There is no way to rollover or transfer the kWh overproduction credits to the other meter on the same bill.

  • Net metering and buyback rates mean two meters lead to poor economic returns. For customers of Alliant, at the end of the month, the utility buys back any excess energy production at the wholesale rate, which is about a third of the customer electricity rate. So, to return to our example, if a solar array on the outbuilding is producing 1500 kWh and the outbuilding is only consuming 500 kWh a month, the 1000 kWh overproduction on the outbuilding meter will be bought back by the utility at about 1/3 the consumer rate. At the same time, the 1000 kWh of electricity consumption for your home on the other meter will be purchased at the full consumer rate. For customers of MG&E, the overproduction would roll over from month-to-month in the outbuilding meter’s account for the first 12 months, when MG&E would then see that meter is measuring more electricity production than is needed in a 12-month period. At that point, MG&E would switch that meter’s account to “net producer” status, where the utility buys back any energy that is not immediately used at the lower wholesale rate. All of our systems connected to MG&E are designed never to go into “net producer” status since it is economically disadvantageous for the homeowner. With Alliant and MG&E, overproduction on one meter is purchased back at the significantly lower wholesale rate, rather than applied to the electricity demand on the second meter, meaning two meters is economically disadvantageous when going solar.

  • Utility rules may stipulate where the solar array must be interconnected. Returning to our example, it seems that one option would be to install a solar array that produces 1000 kWh a month on the large outbuilding and connect it to the house meter, since the home consumes 1000 kWh a month. Unfortunately, with Alliant, an array on one building cannot be tied into a meter on another building if the two buildings are on separate meters. With MG&E, you can put an array on an outbuilding and tie it into the meter on your home, even if they are on separate meters, but the cost of the work to run electrical lines from the outbuilding to the house would be better spent on combining both buildings on one meter rather than pulling electricity production off one building and running it into the other.

Due to billing structures and utility rules, there are no easy ways to offset the electricity use for the whole property and maximize economic benefits of going solar if the property has two meters.

If you already have two meters, and want to offset all your electricity use, there are three options:

  1. Hire an electrician to consolidate your property down to one meter. The cost will depend on the location of your buildings and meters, but will likely total a few thousand dollars. Fortunately, by offsetting more of your property’s electricity use with solar energy, the cost of consolidating to one meter will pay for itself over time. This is our recommendation for most properties.

  2. Install one array on the building that uses the most electricity on your property. If your home uses the majority of your property’s electricity use and your outbuilding uses a comparatively small amount, then it may make sense to forgo going down to one meter and install one array on your home and attach it to your home’s meter. The converse is true if your outbuilding uses much more electricity than your home.

  3. Install two solar arrays, one connected to each of your two meters. This option makes sense if both your home and your outbuilding have significant electricity needs. In that case, a single array on either your home or outbuilding may not be enough to offset the electricity use for your whole property and installing two arrays, one connected to each meter, would be the right choice. 

WE Energies customer with two meters? You may be in luck. WE Energies allows kWh credits to roll over from one meter to another, as long as three qualifications are met: (1) the same customer’s name is on the bill for both meters, (2) both meters have the same consumption rate structure and the same voltage, and (3) both meters are fed by the same transformer. Wondering if the meters on your property meet these qualifications? We’re happy to help you find out.

If you are considering adding a second meter for a new outbuilding, we would recommend putting your new outbuilding on the same meter as your home. If you have two meters already, we would be happy to recommend the best option for your property to get the most benefit from going solar. 

Do I Have a Good Home for Solar?

Interested in going solar but want to know if you have a good home for an array? These six factors can help you judge if your home is right for a rooftop solar array.

Roof Direction

Homes with a large southern-facing roof are ideal for going solar because panels facing directly south produce the most electricity. Panels facing directly east or west produce about 15% less electricity; panels facing SE or SW produce only 7% less. Solar panels placed on north, northwest, or northeastern roof planes tilt away from the sun and lose 25% or more of their production potential depending on the roof pitch; placing panels on northern facing roof planes should be avoided.

Aesthetics may be a factor in deciding if you have a good home for a rooftop solar array. If your home faces directly south and you do not want to place panels on the front of your home, you may not have the best home for going solar. The roof height, shape, and color typically play a factor in how well solar panels fit onto the front of a home and we carefully design each array and choose panels to look aesthetically pleasing on each home. 

An ideal home for solar: a large, rectangular, southern-facing back roof for a solar array.

An ideal home for solar: a large, rectangular, southern-facing back roof for a solar array.

Solar on the southern-facing front of a home can match the roof space and look aesthetically pleasing.

Solar on the southern-facing front of a home can match the roof space and look aesthetically pleasing.

Solar panels can be placed on a east or west facing roof when a southern roof is not available.

Solar panels can be placed on a east or west facing roof when a southern roof is not available.

Roof space

Almost every home has some southern, southeastern, or southwestern roof space. Large, unbroken, rectangular roof areas are ideal for mounting a solar array. A challenge arises if the southern-facing roof space is too small to accommodate the number of solar panels needed to power the household. Dormers and other complex roof patterns can also leave little space to fit solar panels or may require a solar array to be broken up among many smaller roof planes. Installing multiple small groupings of solar panels also adds a bit to the cost and may or may not meet the aesthetic goals you have for your home.

An ideal roof-space for solar: large and rectangular.

An ideal roof-space for solar: large and rectangular.

With some good design, solar panels can also be placed on more complex roof spaces.

With some good design, solar panels can also be placed on more complex roof spaces.

Shade & Trees

Solar panels create energy from sunlight and should be placed away from sources of shade. A solar panel in the shade of a tree produces 90% less energy than a solar panel placed in the sun.

Most homeowners run into issues when they have trees planted close to their home or large trees to the south of their home; either situation can cast significant shade on your rooftop. Removing trees or installing a ground-mounted solar array on an unshaded part of your property may be the best option for going solar when trees are an issue.

Solar panels can still be installed on rooftops with some shade but adding a solar array becomes less productive and less cost effective the more shade you have. We typically like to see 10% of shade on a roof or less over the course of a day, 20% at the highest, when assessing if a home is right for solar.

An ideal roof doesn’t have any shade from surrounding trees or buildings.

An ideal roof doesn’t have any shade from surrounding trees or buildings.

Some homeowners with higher-than-recommended levels of shade may decide to go solar by adding additional panels to make up for some of the loss due to shade or accepting lower annual electricity production.

Some homeowners with higher-than-recommended levels of shade may decide to go solar by adding additional panels to make up for some of the loss due to shade or accepting lower annual electricity production.

Some homes may look like they get some sunlight but truly have too much shade from surrounding trees to make solar a viable option for their home.

Some homes may look like they get some sunlight but truly have too much shade from surrounding trees to make solar a viable option for their home.

Roof age

In general, we recommend that homeowners with asphalt shingle roofs over 10 years old consider reroofing before installing a rooftop solar array. Most of the deterioration from asphalt shingle roofs occurs due to UV radiation, and some shingle deterioration has likely already occurred in roofs 10 years old and older. Rooftop solar arrays last 30-40 years and the cost of labor to take them down and reinstall them to allow for re-roofing is significant so it makes sense for some homeowners to re-roof before going solar. You can read more about the considerations for re-roofing on our website here.

Roof structure

Based on the age and structure of your home, your roof may need structural reinforcements to handle the added load of rooftop solar panels. Typically, older homes with a rafter roof structure will need structural upgrades within their attic space. (Homes built in the 1950s and earlier likely have rafter construction.) Newer homes with a truss roof structure will not need structural upgrades to go solar. (Homes built in the 1970s and later likely have truss construction.) The need for structural reinforcements may add a couple of thousand dollars to the cost of going solar. In some cases, structural upgrades are not possible without major renovations, such as when the home has finished attic space or a drywalled lofted ceiling, when the rafters begin in the second story rather than at the attic floor, or when an attic space is too small to allow structural reinforcements to be placed.

This older home required both structural upgrades and electrical upgrades in order to go solar.

This older home required both structural upgrades and electrical upgrades in order to go solar.

 Electrical System

In some homes, modifications and upgrades to the electrical systems are required to handle the incoming solar energy. If you have an older or smaller home with a 100 amp main panel, you may need to replace it with an electrical main panel with a higher capacity (200 amp) main panel to handle the incoming solar energy. We can calculate your electrical system needs based on the solar array design and an area electrician could be contracted to do a main panel upgrade if it were required before going solar. Newer homes looking to add a large array may need some minor electrical upgrades that can be done at the same time as the solar installation at a small additional cost.

Many homes can become a great solar home with some work and some additional cost. Roofs can be re-roofed, structural upgrades to the roof structure can be added, and electrical main panels can be upgraded. Other homeowners face tough decisions about removing trees and the placement of solar panels in order to go solar. And unfortunately, some homes are just not the right fit for a rooftop solar array based on their structure, location in a heavily wooded area, or complex roof lines with lots of dormers.

For those homes unable to install rooftop solar, your utility may offer options for owning a share of a community solar array. You can learn more about MG&E’s Shared Solar program here and Alliant's Community Solar program here.

Still not sure if your home is right for a rooftop solar array? Reach out to us at mdrews@drewssolar.com and we would be happy to take a quick look at your roof and let you know.

Guide to Comparing Solar Quotes

It can be overwhelming to compare quotes from multiple solar companies. (And we always recommend getting at least two!) Which numbers really matter? How important is the choice of solar panels? How do I sort out conflicting information? Which system is really the right choice for my home? This guide is our honest and straightforward attempt to help you sort it all out.

DSC07672.jpg

Price: Compare Price per Watt

When comparing the price of your solar array, it is important to compare two different factors: (1) the total price of the system to make sure it is within your budget and (2) the price per watt to see if you are getting a good deal. The number of total watts (w) or kilowatts (kW) in your solar array determines how much energy the system can produce. All other things being equal, like the amount of shade and orientation of the panels towards south, the more kW your solar array has, the more energy it will produce.

Solar arrays are like boxes of cereal. The smaller box may appear to be the better price, but when you calculate the price per ounce, it may turn out that the larger box of cereal is actually the better price. To compare cereal across brands and sizes, you need to compare the price per ounce to find out which choice is the best deal.

To compare solar quotes and find out which choice is the best deal, compare the price per watt and not just the total cost. If the price per watt isn’t listed in the estimate, take the total price of your system before incentives, divide the number by the total kW of the system, and then divide that number by 1000 to get the price per watt. The final number is typically $2-4 per watt.


System Size: Compare the Total kW

To compare the size of a solar array, many customers are tempted to compare how many solar panels are included in each quote. Unfortunately, solar panels come in different sizes and cannot be compared equally. To find out how much solar you are getting in each quote, you need to compare the total kW size of the system, not just the number of panels. The kW size of the system determines the electricity production of the system, not the number of panels. Four 300-watt panels will produce the same power on the same roof as three 400-watt panels; they will each form a 1.2 kW (or 1200 watt) solar array. By looking at the total kW, you can compare how much electricity production capacity is included in each quote.


Screen Shot 2021-05-18 at 2.38.20 PM.png

Solar Panel Efficiency: Consider the Panel Size

It may be tempting to think that higher-wattage solar panels are more efficient or higher quality than lower-wattage solar panels. Isn’t a 420-watt panel better than a 360-watt panel? Not necessarily. With solar panels, higher wattage does not equal higher efficiency. The physical panel size also needs to be considered.

Solar panels come in a variety of physical sizes. Higher-wattage panels tend to be physically larger (such as a 390 watt, 72-cell panel, 3.3’ by 6.5’ panel) while lower-wattage panels tend to be smaller (such as a 330 watt, 60-cell panel, 3.3’ by 5.6’ panel). Higher-wattage panels aren’t necessarily higher-efficiency or “better” panels, they are likely simply physically larger panels.

Many solar installers, ourselves included, use smaller panels for residential installations because the smaller physical panel size allows us to rearrange panels into more configurations to better fit each roof. By using smaller panels we are actually able to fit more power production on each roof. This isn’t always the case; when the roof geometry allows, larger panels may be the right choice for your home.

There are higher efficiency panels on the market. These panels produce more energy while staying physically smaller in size. But the trade-off for efficiency is cost. For example, the REC 370-watt panel is a premium 60-cell panel that’s only 3.33’ x 5.65’ in size but costs 40% more per watt than the 3.45’ x 5.75’ Qcell 340-watt panel. Since these higher efficiency panels cost more, we only recommend them to customers with limited roof space that need to squeeze out every watt of power production they can with their limited square footage. Generally, the more cost-effective way to produce more power is simply to add another standard-efficiency solar panel rather than switching to more expensive high-efficiency panels.


Energy Production: Beware Overestimates

Every solar company needs to make several assumptions when calculating how much electricity a solar array will produce. How much shade from surrounding trees and buildings will cover your array throughout the year? How much snow will cover the array in the wintertime? How much production will be lost due to system inefficiencies, temperature fluctuations, and weather? At Drews Solar, we tend towards more conservative estimates when making assumptions. This means our estimates and quotes may show our arrays producing less power annually than our competitors. Other companies make more optimistic assumptions about how much electricity their systems will produce.

The solution? Hold the energy-production and annual-offset estimates loosely. Compare the kW size of the solar array, not the amount of power the solar company tells you the array will produce. If you receive two estimates for a 6 kW solar array and one tells you the array will produce 6000 kWh of electricity per year and the other tells you it will produce 8000 kWh of electricity per year, know that you are likely to get production somewhere in that range, but that there are too many factors for a perfect prediction to be made.

At Drews Solar we tend to be more conservative in our estimates because we want our systems to produce at least as good as we predict. While our ultimate goal is to be as accurate in our assessments as possible, we’d prefer our customers to be pleasantly surprised that their systems produced more power than their quote estimated rather than be disappointed it is not producing at the level they expected.


Quality: Look at Independent Reviews and Warranties

When trying to assess the quality of panels, inverters, and other components of your solar array we recommend looking at independent testing and data. PVEL, an independent testing group, offers scorecards for both panels and inverters that may be worth consulting when choosing your array.

Another thing to consider is the warranty offered with the inverters or panels. If your panels and inverter(s) come with a 25-year warranty, they are likely high quality, reliable components.

One note when comparing panels and other components: don’t get caught up in looking for the “best of the best.” There are a lot of quality, reliable panels and inverters on the market that will dependably produce power for you across the lifetime of your solar array. Just like cars, a Honda may not have the highest specs when compared to a BMW or an Audi but will just as reliably get your family where you need to go. We recommend high-quality panels and inverters but find chasing the highest-end specs often results in just higher prices with very little additional electricity production or reliability. The same goes with choosing consumer-name-brand panels. While customers may know the names LG or Panasonic more than they know Silfab, Qcell, or REC, within the world of solar panel production, consumer-name-brand panels are not necessarily better than name brands known only within the solar world.


Installation & Customer Service: Look at Online Reviews

Your home is likely your largest investment. You want a solar company that takes care of your home, your roof, and your electrical system. You also want to choose a solar company that will take good care of you throughout the process, making it easy to go solar without causing you headaches and confusion along the way, and will provide quick and quality service to your system if it is ever needed. There are many quality installers in Wisconsin, but we highly recommend reading online reviews before choosing your solar installer to make sure you choose one that will take good care of you and your home. The highest quality panels and components mean little if they are poorly installed or your home or roof is damaged in the process.


Return on Investment and Financing: Look at the Total Cost

Return on investment and savings over the lifetime of your solar array are both great indicators of the value of your solar array, but there are two assumptions that need to be made when calculating these numbers: (1) the amount of energy your solar array will produce each year and (2) the projected rise in electricity costs over time. As outlined above, each solar company needs to make several assumptions when calculating the amount of energy your solar array will produce each year, and therefore the return on investment and savings over the lifetime of your array may end up being overestimates or underestimates, based on the assumptions the installer made. Drews Solar tends to make conservative assumptions that may lead to underestimating the savings over time. Other companies may tend toward optimistic assumptions that may lead to overestimating the savings over time. Electricity costs also tend to increase over time. The more a solar company assumes they increase over time, the most cost effective going solar will look on paper. Drews Solar assumes the more conservative 2.2% yearly rise in electricity rates based on historical data. Other area solar companies assume electricity costs will rise at rates as much as 4% a year, which makes going solar look even more economically advantageous on paper than our 2.2% increase projection.

Some solar companies offer in-house financing. It may be the right choice for certain homeowners, but we recommend considering at least one other option, such as a loan from your own bank or credit union, when financing a solar array. You may find that your system may end up costing you double when choosing to financing through a solar company rather than paying for it outright or financing your solar array through an independent bank or credit union. We recommend considering the total costs of going solar and not just the monthly savings to see which option will be the most cost-effective choice overall.


At Drews Solar we are committed to integrity and quality. We want happy customers over the whole lifetime of their solar array, which means we are committed to the highest quality installation and materials, we sweat the details to get it right, and we communicate with honesty and integrity every step of the way. These aren’t just words- it’s who we are.

Still having trouble sorting out which contractor or system is right for you? We’d be happy to look at the other quotes you’ve received and give you our honest assessment of your choices. If we’re not the best choice, we’ll let you know which other contractor we recommend or do our best to update our quote to give you the best system at the best price possible.

2021 Solar Panel Options

Based on your goals and priorities, we’ll help you find the right panels for your rooftop array.

Panel availability may change month to month.

Panel availability may change month to month.

Screen Shot 2021-05-03 at 9.52.10 AM.png

We offer four brands of high-quality, all-black, highly-rated solar panels: Trina Solar, Qcells, LG, and REC. We are confident any of the four choices would be a good choice for your home.

Trina and Qcell panels hit the sweet spot of high productivity and high quality at a reasonable cost. We recommend Trina or Qcell panels for almost every job. To produce more power, it is often most cost effective to add one additional Qcell or Trina panel rather than jumping up to higher-wattage panels.

LG and REC panels offer higher-wattage options with higher guarantees of power output over the lifespan of your solar array. Consider LG or REC panels if you have limited space and need to maximize the power output of each individual panel or if you plan on staying in your home for the entire 30-40 year lifespan of your array and want to see the most consistent productivity as possible.

Trina, Qcell, and REC panels have all been classified as a “Top Performer” by PVEL, an independent agency that conducts tests for product quality and reliability.  

You cannot go wrong with choosing any of these four panels. If you are looking to go solar at a reasonable cost and want reliable highly-rated panels, we recommend our Trina or Qcell panels. If would like to invest a bit more in your array to get more power out of limited space, then we recommend our LG or REC panels.

The Type of Metal Roofing & Why It Matters

Rooftop solar works wonderfully on most metal roofs. With metal roofs, homeowners do not need to worry about re-roofing during the lifetime of the solar array. Solar panels look great against a metal backdrop. And some metal roof designs allow solar to be installed without drilling numerous holes through the metal roof material. But depending on the type of metal roof you have, there may be some structural and installation issues that need to be taken into consideration when adding rooftop solar.

What Type of Metal Roof Do I Have?

To know what to expect when adding rooftop solar, the first step is identifying the type of metal roof you have. There are a few main types of metal roofing:

  1. Exposed fastener metal roofing (also known as “screw down” metal roofing) uses screws placed through the metal roofing to attach it to the roof structure below.

  2. Standing seam metal roofing uses hidden fasteners under the seams of the metal roofing material to attach it to the roof structure below.

  3. Metal shingle roofing is any type of metal roof that is designed to look like traditional shingles.

How to tell what kind of roofing you have:

An exposed fastener metal roof. Both the lack of roof sheathing and horizontal purlins sitting on the trusses are clues this is an exposed fastener roof.

An exposed fastener metal roof. Both the lack of roof sheathing and horizontal purlins sitting on the trusses are clues this is an exposed fastener roof.

  • Metal shingle roofs are easy to identify because they are designed to look like traditional shingle roofs but are made out of metal.

  • Exposed fastener and standing seam metal roofs can look similar: they are made of large sheets of metal with vertical seams and can come in a variety of metal materials and colors.

  • The best way to tell the difference between exposed fastener and standing seam metal roofs is to look for screws on the face of your roof. If you can see these screws or fasteners on the face of your metal roof, then you have an exposed fastener metal roof. If you do not see them, then you have a standing seam metal roof.

  • If it is difficult to see your metal roof from the outside, you may be able to get a clue by looking at your roof from the inside. If you look up at the roof from within the attic and see metal, you most likely have an exposed fastener roof. If you see roof sheathing (such as sheets of plywood or OSB), you are more likely to have a standing seam metal roof.

  • You can also look at the structure of your roof from the inside. If you look at the roof structure and see horizontal purlins (long pieces of 2x4 lumber) between your roof’s trusses and your roof, you more likely have an exposed fastener roof. If you do not have purlins and the roof sheathing sits directly on the trusses, you more likely have a standing seam metal roof.

  • The type of building gives you another clue. Outbuildings are more likely to have exposed fastener metal roofs. If you have a pole barn, such as a Cleary or Morton building, 99 times out of a 100 you’ll have an exposed fastener metal roof.

Metal Shingle Roof

Unfortunately we cannot install solar arrays on existing metal-shingle roofs. If you are considering adding a metal shingle roof to your new or existing home, you can still go solar by planning ahead. We will work with you and your roofing company to install attachment-points for your rooftop array before your metal shingle roof is installed. Your roofing company can then roof around the solar attachments, just as they do chimneys and roof vents. Once your new roof is fully installed, we return and complete the installation of your solar array, leaving you with a beautiful metal roof, sealed attachment points, and elegant rooftop solar.

An array being installed on a standing-seam metal roof. The solar racking is clamped directly to the standing seams.

An array being installed on a standing-seam metal roof. The solar racking is clamped directly to the standing seams.

Standing Seam Metal Roof

We can install solar arrays on most standing seam metal roofs. With standing seam metal roofs, we are able to attach the solar array by clamping onto the seams of the roof, allowing us to avoid drilling holes in your roof to secure the array. For roof pitches over 4/12, we highly recommend textured standing seam metal roofs; steep, smooth standing seam metal roofs may require a boom lift for solar installation, adding to the cost of going solar.

Most homes and buildings with standing seam metal roofs do not require structural upgrades to go solar, since the load of the solar array can be placed on the existing trusses. For some standing seam metal roofs, especially ones installed on older homes and outbuildings, there is a chance structural upgrades would still be needed, especially if the home or outbuilding is constructed with rafters instead of trusses.  

Exposed Fastener Metal Roof

An outbuilding with an exposed fastener metal roof. Due to the purlins placed on top of the trusses, structural reinforcements were needed before adding a rooftop solar array.

An outbuilding with an exposed fastener metal roof. Due to the purlins placed on top of the trusses, structural reinforcements were needed before adding a rooftop solar array.

We can install solar arrays on most exposed fastener metal roofs. Unlike standing seam metal roofs, we need to drill through the metal roofing to secure the solar array.

Exposed fastener metal roofs usually require structural upgrades to be made to the interior structure of the roof. If you can see that your roof is constructed with purlins (long pieces of 2x4 lumber between or on top of your roof trusses), you will very likely need structural upgrades. To do the structural upgrades, we add lumber to the existing horizontal purlins. This both gives us the necessary attachment points for a rooftop array and allows your roof to handle the added load of rooftop solar. These structural upgrades usually add to the cost of going solar.

If you are in the process of adding a pole barn or any outbuilding with an exposed fastener metal roof, please discuss the design with us before having it built. It is much more cost-effective to have the necessary lumber added during the construction process rather than having us retrofit the roof structure once it is complete.

It is possible to go solar with most metal roofs, especially if you plan ahead. Depending on the type of metal roof you have, structural upgrades may be needed to make solar possible. By planning ahead, you can make it easier and less expensive to add rooftop solar.

Getting an Electric Vehicle?

Thinking of getting an electric vehicle in the next few years? It may make sense to add more panels now.

SolarEdge Car Charger.jpg

More and more homeowners anticipate purchasing electric vehicles in the next few years and hope to power their new vehicle with solar energy. By choosing the right size solar array now, you’ll have the power you need to charge your EV later.

It’s Not Easy to Add a Few Extra Panels in the Future

During the initial installation, we generally recommend sizing the system to meet expected energy needs, instead of installing one size system now and increasing the system size the future. A solar array is more than just the panels on the roof, and the wiring, inverter, and home interconnection all need to be sized based on the kW size of the array. That means we cannot install a few additional panels on the roof if the rest of the system is not designed to handle the extra incoming energy. There is one exception: if a homeowner plans ahead and oversizes their inverter, wiring, etc, during the initial installation, it is possible to add additional panels in the future. But there is one more factor to consider:

Adding Additional Panels Now is More Cost-Effective

Adding more panels in the future requires going through the drawing, permitting, installation, and interconnection process again. Since homeowners have to pay for these steps twice, an installation done as two separate projects is more expensive than installing a larger array all at once.

We Can Estimate How Much Electricity Your New Car Will Require

Fortunately, it is relatively easy to anticipate how much electricity your future electric car will require and size your solar array to meet your future needs. On average, each kWh of electricity can provide three miles of all-electric driving. Based on your estimated annual mileage, we can guess how many additional kWh you will need each month to charge your electric car. For instance, if you plan on driving about 10,000 miles each year in your new electric car, you would need about 280 kWh of additional power each month to charge your vehicle.

Inverter + Car Chargers are Available

There is one final advantage to planning ahead for an EV when going solar: some inverters come with built-in car chargers. This 2-in-1 solution allows homeowners to avoid having to install a separate car charger when they are ready to go solar. The combination inverter-chargers are not available in all sizes and are not right for all home layouts, but they are the right fit for some homes. Let us know if you are interested in seeing if this option would work for you home.

If you plan on getting an electric car in the next few years and hope to charge it with solar power, then it is easy to plan ahead to make it happen. You’ll save money in the long run and will be traveling using clean, renewable energy!


When to Consider Reroofing Before Going Solar

If you have a traditional asphalt-shingle roof that is older than 10 years old, you may want to consider reroofing before going solar.

english-gray-gaf-roof-shingles-0847280-64_400.jpg

Most asphalt shingle roofs are designed to last up to 30 years, while our rooftop solar arrays are designed to produce renewable energy for at least 30 to 40 years. While it may seem that reroofing at least once in the lifespan of a solar array is likely, there is good news. Most of the deterioration from asphalt shingle roofs occurs due to UV radiation, but since our solar arrays are mounted close to the roof’s surface, the shingles are shaded. The rooftop solar array significantly slows down the deterioration process, making it possible for homeowners to avoid reroofing under their solar array if they plan ahead.

In general, we recommend that homeowners with roofs over 10 years old consider reroofing before installing a rooftop solar array, since some shingle deterioration has already occurred. When the roof doesn’t need to be replaced in full, many solar customers simply reroof the area where the solar panels will be installed and leave the other roof planes to be replaced years down the road when needed.

Is it possible to reroof during the lifetime of the solar array if it’s needed? Absolutely. But in order to reroof, the panels, racking system, and wiring all need to be removed and then reinstalled once the new roof is put on. To make sure the system gets reinstalled properly, a qualified solar installation team should do the work. We currently charge $250 to $300 per panel to cover the cost of labor to remove and reinstall an array for reroofing. By reroofing before going solar, homeowners can avoid the removal and reinstallation process.

Not all asphalt shingles are created equal, so some roofs fall outside of these general recommendations. For homeowners who are unsure if they should reroof before going solar, we are happy to assess the roof shingles at a site visit and give a personalized recommendation based on the condition of their roof.

5 Tips for Choosing a Great Home for Going Solar

Teal 1.jpeg

Adding solar panels to your new home is a great way to save money! Most rooftop solar arrays pay for themselves in ten to fifteen years and will produce clean electricity for thirty to forty years, significantly reducing your electricity bill for decades to come. Federal tax credits and state rebates are also available for most systems, reducing the initial investment needed to go solar.

If you’re looking to purchase a new home that’s great for solar, here are a few things to consider:

1) Solar panels should face south. The closer the solar array can be oriented towards due-south, the more productive and efficient the solar array will be. Arrays can be placed on southern, southeastern, and southwestern facing roof planes around your home.

2) Shade matters. Solar arrays need sun to produce electricity! It is best to have very little shade fall on your solar array from trees or tall neighboring buildings. Trees that are tall or close to the south of the home frequently cast too much shade on the roof to make solar a viable option for the home.

3) Large roof-planes are best. Solar panels need space! Some homes have many small roof planes, divided up by dormers, hip-roofs, and stepped roof-lines. Large roof-planes that allow for large rectangular solar arrays are often the most efficient and aesthetically pleasing. Installation costs often go up when installing small arrays on multiple roof planes.

4) How it looks matters! Solar has come a long ways and can be a sleek, elegant addition to your home. Having a beautiful solar array helps increase the appeal and future resale value of your home. Look for a solar installer that cares about aesthetics. All black panels without silver lines or frames are often the most elegant choice, especially for homes with darker roofs. Look for installers that use low racking systems to keep the panels as flush with the roof as possible, ideally with black racking materials that hide beneath the panels. Find an installer that will work with you to create a sleek design for your array that matches the shape of your home. Choosing a home where the back or side of your home faces south preserves the look of your home from the street when adding solar.

5) Consider garages and outbuildings. Even if your home is not ideal for adding solar, your garage, barn, large shed, or outbuilding may be perfect. If you are looking for a home on a large plot of land, a ground-mounted solar array may also be a great option for your property.

Finally, if you are in the market for a new home, ask your lender about adding solar to your mortgage. Some lenders offer options to add the cost of a new solar array installation to your mortgage, allowing you to finance your system and begin using clean, affordable energy soon after moving into your new home.

Planning for solar on your new home

Many people want to add solar panels while they are building a new home, and others prefer to do it later, sometimes years down the road. If you want to go solar while building, that's great! Just give us a call and we can work with your builder to make it happen. But if you're thinking of adding panels later**, there are a few things you can do to ensure you'll be able to add panels without a hitch.

Roof structure

Most new homes are built with pre-made engineered trusses made of 2x4 lumber and spaced every 24". If this the case for your new home or garage, you should have no problem adding solar panels in the future. These modern engineered trusses are designed in a way that very nicely facilitates the addition of solar panels - now or at any time in the future. Some home builders will talk about special “reinforced” areas for solar but this is absolutely not necessary if your home is being constructed with modern engineered trusses. If your roof will be constructed with anything else, such as a different type of truss, timber beams, or I-beams, you'll want to give us a call and ask if solar panels might still work for the roof in question. You'll also want to give us a call if the roof is over a vaulted ceiling, because the roof will likely not be constructed of a typical truss system.

Roof tilt

Solar panels can be installed flush to any roof between 10 and 50 degrees, but if you're building a new structure, you'll want to consider a pitch more optimal for solar panels. In general, if you don't heat and cool your home with a geothermal system, the best roof pitch for solar panels will be between 30 and 45 degrees. If you have a geothermal system, the best pitch will be between 35-45 degrees.

Roofing material

Most homes in Wisconsin have asphalt-shingles roofs, and if this is the case for your new home, great! Incorporating solar panels will be no problem either now or anytime in the future. We are often asked if we need to install the solar panels before or while the shingles are being installed, and the answer is no - we always wait to install the panels until after the roofing is complete. If the roofing material is standing-seam or corrugated metal, reach out to us via email before roofing to make sure your roofing material is compatible with solar panels - some styles are and some are not. And if your roof will be covered by metal shingles, clay or concrete tiles, or slate, we will not be able to incorporate solar panels.

Roof Vents

Solar panels cannot be placed over roof vents, so a single roof vent can mean one less solar panel and a “broken up” or “hole-filled’ array design, which is less efficient and less aesthetically pleasing. Roof vents should not be placed in the area of a potential rooftop solar array.

Electrical Service & Main Panel

If your utility is not WE Energies. The main electrical panel in most new homes is rated at 200 amps. For systems under 8 kW, a 200 amp main panel and a 200 amp main panel bussing is just fine. But many new homes require a larger system. For systems 8-12 kW in size, we highly recommend installing a 200 amp main panel with a 225 amp bussing. The 225 amp bussing allows us to back feed electricity from a 8-12 kW solar array without doing additional (and sometimes very costly) electrical upgrades. Most new construction homes fall into this size range. If you are planning on a very very large solar array, over 12 kW in size, there are some situations where you may want a 300 or 320 amp service. These are rare cases, but if you believe you will be installing a very very large solar array, please reach out and we can help assess your needs.

If your utility is WE Energies. We don't need to worry about the size of the main electrical panel if your property is in the WE Energies territory, but we do need to make sure that the meter pedestal has two meter positions, one for the house and one for the solar array. The most common model is Milbank U1783.

Inverter Space

You will need 3' of space on the wall next to your main panel for the placement of your solar inverter. There needs to be 3' of clearance in front of that space (so, for example, the inverter can’t be hiding behind a water heater) and the main panel shouldn’t be drywalled-in. You will also need to We need to connect an Ethernet cable from your solar inverter to your wireless internet router; you can plan ahead for this however makes sense for you. 

Garages

If your garage will be connected to your home, we will typically have no problem tying the solar array to the home's main electrical panel. But if your garage will not be attached, please give us a call to discuss your options to ensure you are setting yourself up for success.

Internal conduit

When installing a solar array we will need to connect the solar panel wiring on the roof to the wiring near your main panel in the basement or garage. We can always attach a small inconspicuous conduit to the outside of your home if an internal conduit wasn't installed when the house was built, but why not plan ahead? You'll want to talk to a solar contractor about the size and location of this conduit. Generally we recommend 3/4” hard or flexible metal conduit running from your attic to the area of your main electrical panel. The home electrical contractor can install it, and will probably do it for free.